Phase 2: Advanced Testing Goals
Timeline: Phase 2 begins March 22th, 2025, and focuses on desktop UI validation, peripheral compatibility, and Edge AI demo exploration. This phase dives deeper into real-world use, showcasing Tachyon as a full Linux system and intelligent edge device.
What We Want to Validate in Phase 2
Building on Phase 1, this stage explores the desktop experience, peripheral performance, and the built-in AI demo. Here’s what we’re looking for:
- Validate the display output using different monitors and hubs.
- Test USB-C hub compatibility and accessory support.
- Explore the built-in desktop experience and app ecosystem.
- Run and provide feedback on the preloaded AI demo.
- Install and test additional Linux desktop apps.
- Identify performance issues or UX blockers for deeper workflows.
Connecting Tachyon
Setting up Tachyon is simple yet flexible. The kit includes wired connections—however, support for USB-C monitors, wireless peripherals, and a huge expansion ecosystem is just a step away.
⚠️ Note: We recommend completing this setup before powering on the device, due to known hotplug issues (see EVT caveats). Specifically, USB-C hubs must be plugged in before boot.
Quick Start Connectivity Guide
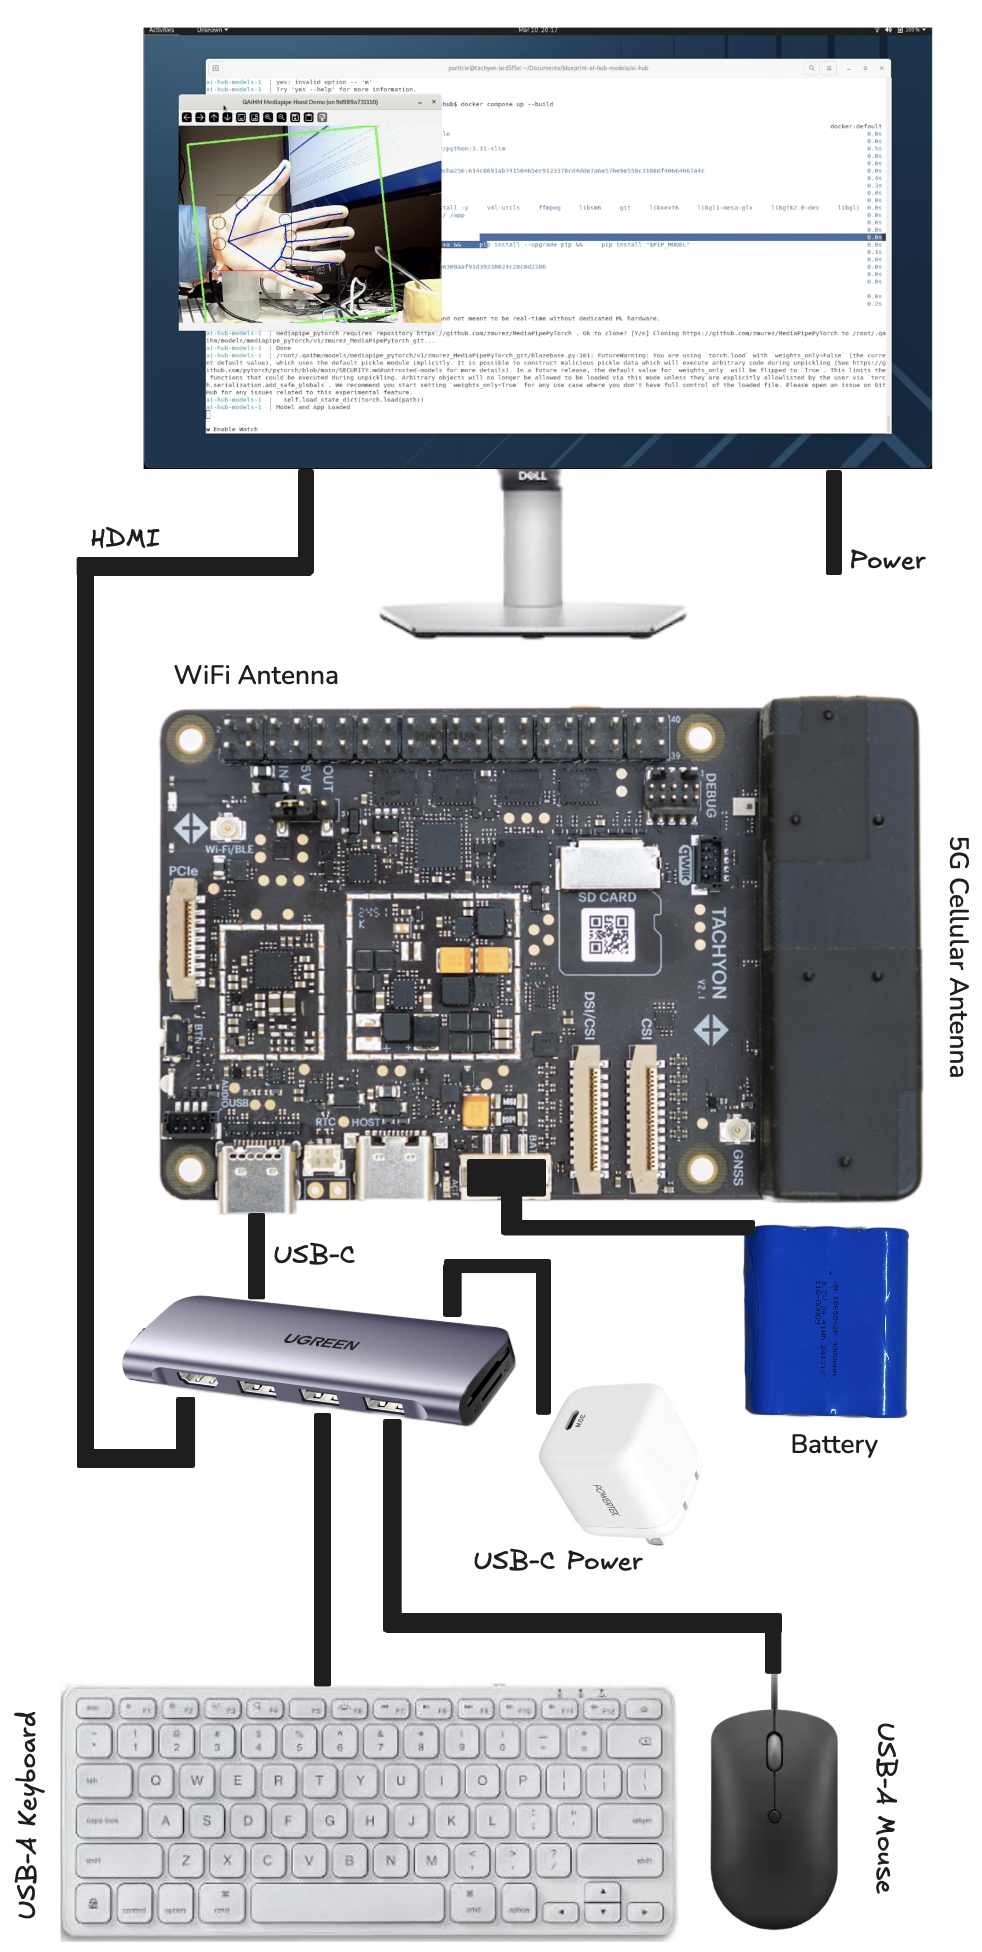
Connect the device using the following cables for the fastest getting started path. While Tachyon supports a wide range of connectivity options, sometimes the quickest and most reliable way to get going is simply plugging in a wire!
- Basic setup: This diagram covers the core connectivity needed to get Tachyon up and running out of the box.
- USB-A webcam: Just plug it into another USB-A port on your USB-C hub. That’s it!
- One-cable display setup: A single USB-C cable can handle power, video, and USB if your monitor supports it! (Not the focus of this guide due to USB-C complexity.)
- Wireless peripherals: Bluetooth keyboards and mice are supported but not included. Reduce cable clutter if you’ve got them!
- Battery: For this initial partner kit, the battery must remain connected at all times. Cellular performance is greatly improved when both battery and USB-C are present. Updated single-cable-powered hardware arrives in April 2025.
- Debug and audio connector details: Refer to Particle’s official documentation for pinouts and more.
📸 Diagram: Basic Wiring Setup
Step-by-Step Setup Instructions
Follow these steps to boot into the desktop experience and explore the built-in demo:
- Plug in the HDMI, keyboard, mouse, power supply, and USB-C hub. Everything you need is in the box. Make sure the monitor is powered!
- Power up Tachyon – Briefly press the button. It’ll go from red to flashing green while booting. If successful, the desktop UI appears and the LED transitions:
- Green flowing = running
- Purple glowing = Wi-Fi connected
- Magenta glowing = cellular connected
- Login – Username is
particle, password isparticle(no quotes). - Follow the on-screen setup – If already provisioned, no action is needed.
- Run the preloaded AI demo – See AI inference in action with the YOLO-Pro model from Edge Impulse and the included USB webcam (plus toy car!).
- Explore more – Install apps, try web browsers, code editors, or deploy your own models. Use the Particle console to manage devices and data.
Known Issues & Caveats
Please keep these in mind during testing:
- ⚠️ Display hotplug bug – The device must be powered on with the USB-C hub already connected. Dynamic detection isn't supported yet.
- 🛠️ Battery requirement – You must leave the battery connected in this kit to ensure stability, especially for cellular operations.
- 🔌 One-cable mode works but needs more compatability testing – Variability in USB-C implementations might make this a compatability issue.
Engagement & Feedback
We’re especially interested in:
- How the desktop experience performs (latency, app loading, display scaling).
- Compatibility feedback with your monitors and USB-C hubs.
- Usability notes on the Edge AI demo and webcam experience.
- Additional ideas on how this could be used in real deployments.
🚀 Phase 2 is where Tachyon gets really fun. Thank you again for helping us shape this future.