Setting up your Tachyon
Let’s get your Tachyon up and running! 🚀
In this section, we’ll walk through how to set up your Tachyon using the Particle CLI (Command Line Interface) and flash the latest OS and SysCon firmware. Whether you're upgrading an existing device or setting it up for the first time with the CLI, you're in the right place.
Gather all the required components:
- Tachyon device
- 3-pin Li-Ion battery (included in your kit)
- USB-C cable — We recommend a USB 3.1 Gen 1 or higher.
You can use USB 3.0 for initial setup, but if you’re planning to stream video or transfer large files, go with a higher-spec cable.⚠️ Make sure it’s not just a charging-only cable!
- 💻 A computer (Windows, macOS, or Linux) to update the OS and configure the device
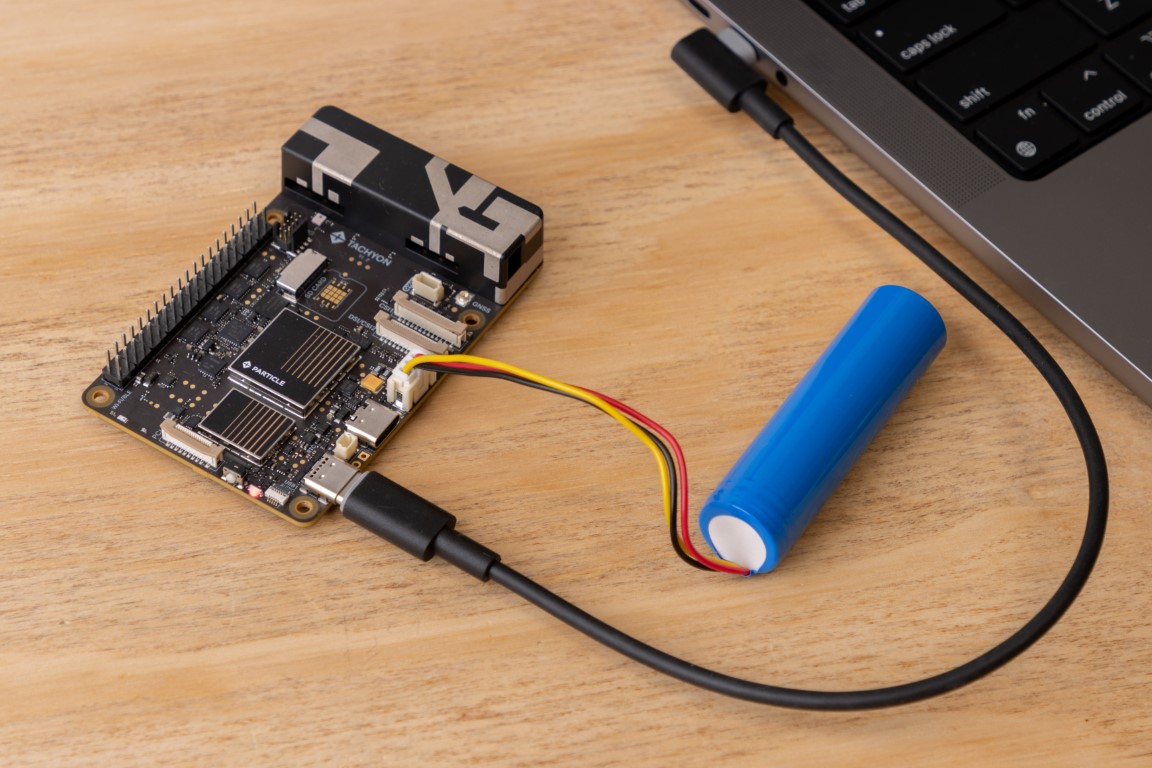
Connect everything
-
Plug in the battery
Connect the 3-pin Li-Ion battery into the matching 3-pin battery connector on the board.It only fits one way! There’s a small guide tab to make sure you can’t insert it backwards. To unplug, gently pull — no tools needed.
-
Connect USB-C
Plug one end of your USB-C cable into the primary USB port (USB1) on Tachyon, and the other end into your computer. -
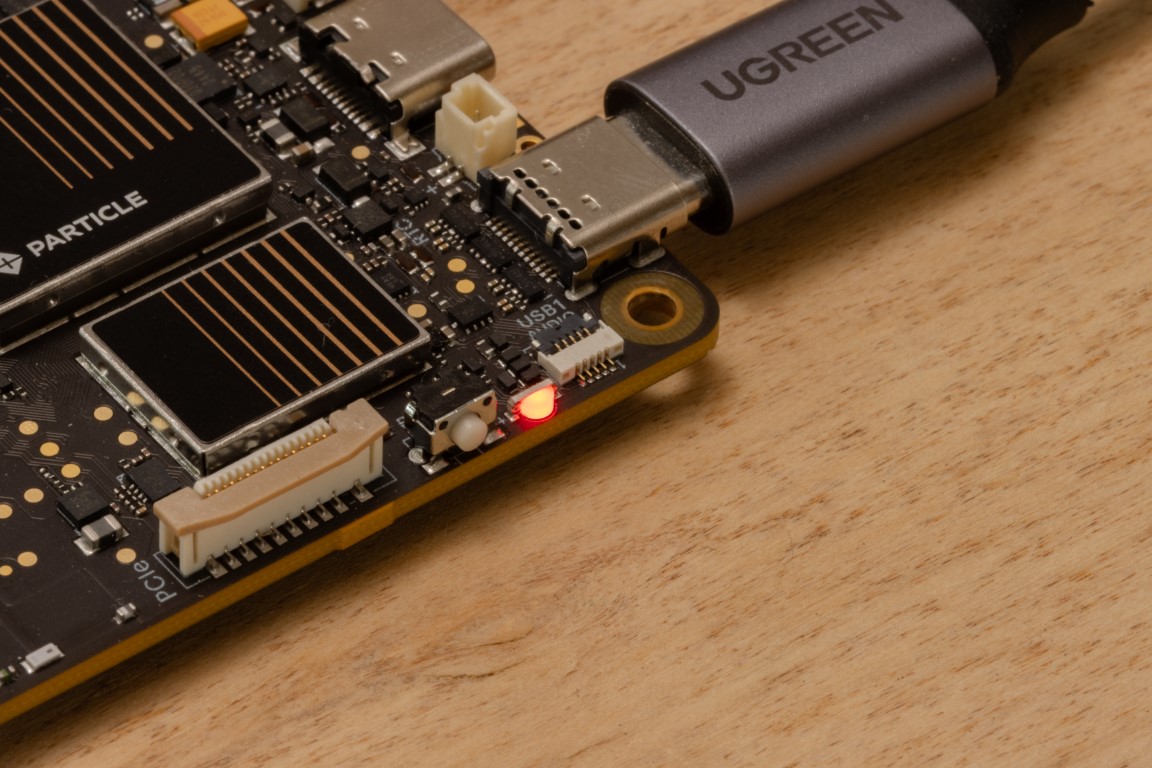
Power check
The primary LED on the board should light up red — that means Tachyon is powered on and ready!
Once you have your Tachyon device and necessary accessories ready, the next step is to install the operating system and configure the device. This process ensures that the device is properly registered, connected to the network, and ready to interact with the Particle Cloud.
By the end of this guide, you will have:
- Installed the latest Tachyon OS.
- Configured Wi-Fi, root password, and SSH access.
- Registered your device in the Particle Console.
- Flashed the firmware and system settings.
- Prepared the device for first boot.
This process takes about 3-10 minutes, depending on your internet speed and system resources.
Once complete, the device will be ready to boot into Linux, establish network connectivity, and become fully operational.
One of the key decisions when setting up a device is whether it operates in what Particle terms Headless mode or Desktop mode. There’s a highlight page here that describes the differences in detail, but here’s a quick overview:
- Headless mode is designed for traditional IoT deployments. These devices typically do not have a display or user interface and boot directly into the application runtime.
- Desktop mode comes with a pre-installed desktop environment, allowing you to plug in a display, mouse, and keyboard for direct interaction.
Both modes support all Particle services and features, including cellular connectivity, remote configuration, and over-the-air (OTA) application updates.
⚠️ System Updates: Only the Headless build supports A/B system updates (which replace the entire root filesystem image). This limitation exists due to the larger file size of the Desktop build.
Stage 1: Get the Latest Particle CLI
The Particle CLI is your go-to tool for flashing and managing your Linux-based Tachyon device — all from the comfort of your terminal.
It works great on Windows, macOS, and Linux.
Just open up your terminal and you’re good to go!
While native Windows is fully supported, WSL (Windows Subsystem for Linux) is currently not supported for setting up Tachyon.
We recommend using PowerShell or Command Prompt instead.
👋 Don’t have the CLI?
📥 Download & Install the Particle CLI
Follow the instructions in the link above to install the CLI for your system.
✅ Already have the CLI?
Let’s make sure it’s updated to the latest version. You’ll need Particle CLI 3.36.0 or later.
Run the following command:
particle update-cli
You should see output like:
Updating the CLI to latest
CLI is already up to date
🧪 Verify your installation
To verify the installed version:
particle --version
Expected output is 3.38.1 or higher:
3.38.1
Note: The CLI stores files used to flash your device in your home directory under ~/.particle.
Stage 2: Enter Programming Mode
- Ensure the device is powered and the main LED is lit up red.
- Press and hold the button for 3 seconds to enter programming mode - the LED will automatically transition into flashing yellow.
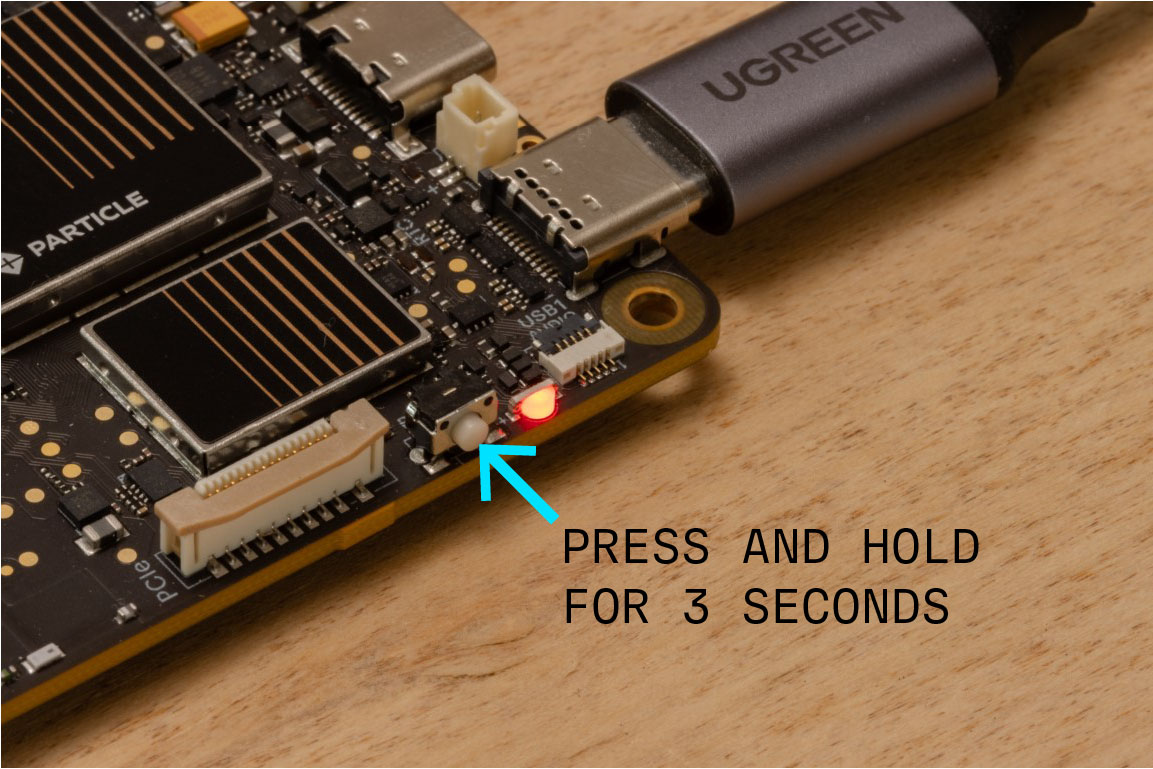
A flashing yellow light means the device has successfully entered programming mode. If it starts flashing green instead, it’s attempting to boot up. In that case, unplug both the battery and USB, then reconnect them and try again.
Stage 3: Enable USB Driver Access
Depending on your operating system, you may need to configure USB access for the Tachyon to communicate properly over USB.
- Windows
- Linux
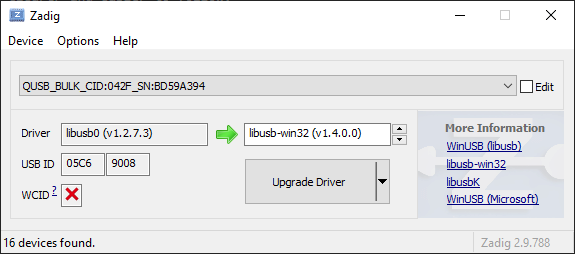
Windows users need to manually install USB drivers, as Qualcomm QCOM devices are not supported natively.
Follow these steps:
- Download Zadig: https://zadig.akeo.ie/
- Ensure Tachyon is in Programming Mode
- Open Zadig
- In the dropdown, select QUSB device
- Choose the libusb-win32 driver
- Click Upgrade Driver
On Linux, users in the plugdev group need permission to access Tachyon over USB. You can configure this by running the following command:
particle usb configure
# This command will prompt for root access
Detailed Setup Walkthrough
Now that the device is powered on, in programming mode, and the Particle CLI is set up, we're ready to begin the setup process!
The Particle CLI will prompt you to connect hardware components during setup. If you’ve already followed the steps earlier in this guide—including connecting the battery, USB-C power, and other peripherals—you can safely skip those CLI prompts.
We’ve included those steps earlier with photos and more detailed instructions to make setup clearer and easier to follow.
This will erase the internal file system (SD card remains untouched - if installed).
Run the following command in your terminal window:
particle tachyon setup
Step 1: Login Check
You'll be prompted with the following message:
===================================================================================
			  Particle Tachyon Setup Command
===================================================================================

Welcome to the Particle Tachyon setup! This interactive command:

- Flashes your Tachyon device
- Configures it (password, WiFi credentials etc...)
- Connects it to the internet and the Particle Cloud!

What you'll need:

1. Your Tachyon device
2. The Tachyon battery
3. A USB-C cable

Important:
- This tool requires you to be logged into your Particle account.
- For more details, check out the documentation at: https://part.cl/setup-tachyon

===================================================================================

Step 1:

Okay—first up! Checking if you're logged in...

...All set! You're logged in and ready to go!
First, the tool checks that you're logged into the Particle platform. This is required to verify device availability, register the built-in SIM, and link the device to your Particle account for management. If you don’t have an account, the CLI will prompt you to create one in your browser.
See Tips & Tricks for help if setup or registration fails.
Step 2: Device Check
The next step is to check if the device is connected and read its device information.
Step 2:

Now let's get the device info

Before we get started, we need to power on your Tachyon board:

1. Plug the USB-C cable into your computer and the Tachyon board.
   The red light should turn on!

2. Put the Tachyon device into system update mode:
   - Hold the button next to the red LED for 3 seconds.
   - When the light starts flashing yellow, release the button.
At this point the CLI is waiting for the device to appear as a USB device in the computer. Make sure you have performed the driver installation steps for Linux and Windows or this step will just spin for ever!
If the device is not found, ensure the USB cable is connected directly to the main USB port of the Tachyon (not through a USB hub).
After it finds the device, it prints out the device information:
Your device is now in system update mode!

Starting Process. See logs at: /Users/johnny5/.particle/logs/tachyon_flash_422a060000000000xxxxxxxx_1748627551843.log

Device info:

 -  Device ID: 422a060000000000xxxxxxxx
 -  Region: NA
 -  OS Version: Ubuntu 20.04
 -  USB Version: 2.1 (use a USB 3.0 port and USB-C cable for faster flashing)
Step 3: Device Configuration
Before flashing, you'll be prompted to set:
- Root Password – Enables root and 'particle' user access for development.
- Wi-Fi (optional but recommended) – Enter SSID and password. Cellular connects automatically.
This setup is for Development Mode, which allows SSH and root access.
Production Mode (more restricted) is coming soon.
Step 3:

Now lets capture some information about how you'd like your device to be configured when it first boots.

First, you'll be asked to set a password for the root account on your Tachyon device.
Don't worry if you forget this—you can always reset your device later.

Finally you'll be prompted to provide an optional Wi-Fi network.
While the cellular connection will automatically connect, Wi-Fi is often much faster for use at home.

? Enter a password for the system account: [hidden]
? Re-enter the password for the system account: [hidden]

Wi-Fi setup is required to continue when using Particle setup!
This active internet connection is necessary to activate cellular connectivity on your device.
? Select the Wi-Fi network with which you wish to connect your device: my-wifi-ap
? Enter your WiFi password: [hidden]
? Re-enter your WiFi password: [hidden]
Step 4: Select Organization & Product
- Choose Sandbox if you're an individual developer, or select your organization if part of a team.
- Then pick a Product to group your device (e.g., "Tachyon Dev" for testing, "Production Tachyon" for deployment).
Step 4:

Next, let's select a Particle organization that you are part of.
This organization will help manage the Tachyon device and keep things organized.

Once you've selected an organization, you can then choose which product the device will belong to.

? Select an organization: Particle
? Select a product: Tachyon Dev
Step 5: Selecting The Software Variant
You'll now choose between the headless variant (for IoT use without a screen) or the desktop environment (ideal for app development).
Select the variant of the Tachyon operating system to set up.
The 'desktop' includes a GUI and is best for interacting with the device with a keyboard, mouse, and display.
The 'headless' variant is for remote command line access only.
? Select the OS variant: desktop (GUI)
Step 6: Select Your Region
Choose the country where your device will operate. This configures cellular connectivity (not language or locale).
Note: Only supported regions are available for now—more coming soon!
Next, let's configure the cellular connection for your Tachyon!
Select from the list of countries supported for the built in Particle cellular connection or select 'Other' if your country is not listed.
For more information, visit: https://developer.particle.io/redirect/tachyon-cellular-setup
? Select your country: United States
Step 7–11: Download & Install OS
- Downloads the latest Tachyon OS image (~3GB)
- Resumes if interrupted and is cached for reuse
- Registers the device and creates configuration files
- Installs:
- Bootloader (UEFI)
- Kernel
- User-space filesystem
- Configuration settings
- Total flashing time: ~3–8 minutes (USB 2.0 vs 3.0)
Step 7:

Next, we'll download the Tachyon Operating System image.
Heads up: it's a large file — 3GB! Don't worry, though—the download will resume
if it's interrupted. If you have to kill the CLI, it will pick up where it left. You can also
just let it run in the background. We'll wait for you to be ready when its time to flash the device.


[█████████████████████████] 100% | Downloading tachyon-ubuntu-20.04-NA-headless-formfactor_dvt-1.0.141.zip ...

===================================================================================

Step 8:

Great! The download is complete.
Now, let's register your product on the Particle platform.

===================================================================================

Step 9:

Creating the configuration file to write to the Tachyon device...

===================================================================================

Step 10:

Okay—last step! We're now flashing the device with the configuration, including the password, Wi-Fi settings, and operating system.
Heads up: this is a large image and flashing will take about 8 minutes to complete.

The device is connected to a slow USB port. Connect a USB Type-C cable directly to a USB 3.0 port to shorten this step to 2 minutes.

Meanwhile, you can explore the developer documentation at https://developer.particle.io

You can also view your device on the Console at https://console.particle.io/tachyon-dvt-00001/devices/422a06000000000000000000

[█████████████████████████] 100% | Flashing complete OS
[█████████████████████████] 100% | Flashing complete Configuration file

===================================================================================

Step 11:

All done! Your Tachyon device is now booting into the operating system and will automatically connect to Wi-Fi.

It will also:
  - Activate the built-in 5G modem
  - Connect to the Particle Cloud
  - Run all system services, including battery charging

For more information about Tachyon, visit our developer site at: https://developer.particle.io!

View your device on the Particle Console at: https://console.particle.io/tachyon-dvt-00001/devices/422a06000000000000000000
Setup Complete!
🎉 Your Tachyon is now fully set up!
If you run into any issues during setup, refer to the Troubleshooting section or reach out to us on the community forums.
Headless Mode
If you selected the Headless variant of the OS during setup,the main LED progresses through several stages: it starts by blinking yellow, then transitions to blinking green, and finally glows green. If you've configured Wi-Fi, the LED will eventually glow magenta. Once the SIM is activated and a cellular connection is established, it will glow cyan.
You can power the Tachyon either by keeping it connected to your computer or by using a USB-C power supply. The battery must remain plugged in at all times.
If you set up your device in Headless mode, you're all set—feel free to move on to the Particle Console section.
Desktop Mode
If you selected the Desktop variant of the OS during setup, the LED will continue blinking yellow. To proceed, you'll need to power-cycle the device and connect the necessary accessories before you can start using it. Detailed instructions are provided in the next section.