Setting Up & Flashing the OS
Once you have your Tachyon device and necessary accessories ready, the next step is to install the operating system and configure the device. This process ensures that the device is properly registered, connected to the network, and ready to interact with the Particle Cloud.
By the end of this guide, you will have:
- Installed the latest Tachyon OS.
- Configured Wi-Fi, root password, and SSH access.
- Registered your device in the Particle Console.
- Flashed the firmware and system settings.
- Prepared the device for first boot.
This process takes about 10-20 minutes, depending on your internet speed and system resources.
Once complete, the device will boot into Linux, establish network connectivity, and become fully operational.
Step 1: Install the Latest Particle CLI
Ensure Particle CLI 3.31.0 or later is installed.
Verify installation:
particle --version
Expected output is 3.32.5 (or higher!):
3.32.5
On Linux, give permissions to users in the plugdev group to access Tachyon over USB:
# will prompt for root access
particle usb configure
Step 2: Enter Programming Mode
- Power the device using USB-C (connected from your laptop to the USB1 connector) and LiPo battery at the same time. The battery is plugged in first normally, but it doesn't really matter.
- The Primary LED should be solid red (standby mode) when the first power source is connected.
- Hold the button for 3 seconds to enter programming mode - it will automatically transition into flashing yellow.
• The LED will automatically flash yellow showing its in download mode
Note: (Yellow may appear slightly sea green due to LED blending on EVT.)
Step 3: Flash the Latest Firmware
Run the following command in the Particle CLI:
particle tachyon setup
This process will:
✅ Select if you want Headless or Desktop software installed ✅ Configure Wi-Fi network ✅ Set root password ✅ (Optional) Add an SSH key ✅ Download & install the latest firmware
⚠️ Warning: This erases the built-in file system (but does not erase the SD card).
Windows Users: You have to install the USB Drivers for the time being.
To do this, follow these steps:
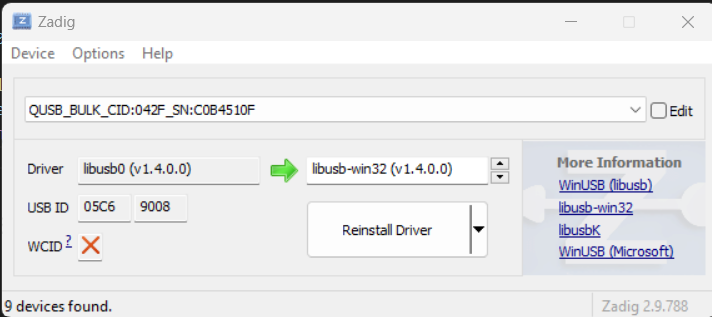
- Download Zadig
- Run Zadig while the device is in Download Mode.
- Select “QUSB device” → Choose libusb-win32 driver → Click Install Driver.
📜 Detailed Setup Walkthough
The following are the step-by-step processes performed by the particle tachyon setup tool.
Step 1: Login Check
As a first step, the tool verifies that you’re logged into the Particle platform.
🛑 Why is this required?
While Tachyon is a powerful device on its own, the particle tachyon setup command requires a Particle account to be logged in in order to register the device in your Particle Console and enable our cloud management functionality.
• See the Tips & Tricks section for more details on flashing if registering a device is an issue.
Example output:
===================================================================================
			  Particle Tachyon Setup Command
===================================================================================

Welcome to the Particle Tachyon setup! This interactive command:

- Flashes your Tachyon device
- Configures it (password, WiFi credentials etc...)
- Connects it to the internet and the Particle Cloud!

**What you'll need:**

1. Your Tachyon device
2. The Tachyon battery
3. A USB-C cable

**Important:**
- This tool requires you to be logged into your Particle account.
- For more details, check out the documentation at: https://part.cl/setup-tachyon

===================================================================================

Step 1:

Okay—first up! Checking if you're logged in...

...All set! You're logged in and ready to go!
Step 2: Device Configuration Setup
You will be prompted to configure password, Wi-Fi, and SSH access before flashing the device.
🔍 What do these settings do? • Root Password → Required for root access during development. This also sets the password for the 'particle' user • Wi-Fi Setup → This is optional (but recommended) - enter your wifi name and password. Note that 5G LTE will connect automatically. • SSH Key → Enables passwordless login (this is optional for those power users)
ℹ️ Note that this is a setup flow for Development Mode (vs Production Mode) • Development Mode → Allows password-based SSH and full root access. • Production Mode → Restricts access for enhanced security (coming soon).
Example output:
Step 2:

Now lets capture some information about how you'd like your device to be configured when it first boots.

First, you'll be asked to set a password for the root account on your Tachyon device.
Don't worry if you forget this—you can always reset your device later.

Next, you'll be prompted to provide an optional Wi-Fi network.
While the 5G cellular connection will automatically connect, Wi-Fi is often much faster for use at home and highly recommended to order to keep your data usage to a reasonable amount.

Finally, you'll have the option to add an SSH key from your local disk.
This is optional—you can still SSH into the device using a password. Adding the key just allows for password-free access.

? Enter a password for the system account: [hidden]
? Re-enter the password for the system account: [hidden]
? Would you like to set up WiFi for your device? (y/n): y
? Enter your WiFi SSID: boom-wifi
? Enter your WiFi password: [hidden]
? Re-enter your WiFi password: [hidden]
? Would you like to add an SSH key to log in to your device? (y/n): n
Step 3: Select Organization & Product
🔍 What’s happening here?
• Tachyon devices must be sorted into a sandbox or an organization. • If you are an individual developer, select Sandbox. • If you are part of an enterprise organization, select the appropriate group.
📌 Why do you need to select a product?
• Products group devices based on intended behavior. • Example: • “Tachyon Dev” → For development units. • “Production Tachyon” → For mass deployment.
Example Output:
Step 3:

Next, let's select a Particle organization that you are part of.
This organization will help manage the Tachyon device and keep things organized.

Once you've selected an organization, you can then choose which product the device will belong to.

? Select an organization: Particle
? Select a product: Tachyon Dev
Step 4: Downloading the Operating System
This step downloads the firmware from Particle's servers. It downloads the latest file automatically.
📌 Key Notes:
• The Tachyon OS image is ~3GB. • The download resumes if interrupted. • Future releases will allow selecting between Headless & Desktop versions.
Example Output:
Step 4:

Next, we'll download the Tachyon Operating System image.
Heads up: it's a large file — 3GB! Don't worry, though—the download will resume
if it's interrupted. If you have to kill the CLI, it will pick up where it left. You can also
just let it run in the background. We'll wait for you to be ready when its time to flash the device.

[█████████████████████████] 100% | Downloading tachyon-ubuntu-20.04-NA-base-1.0.48.zip ...
Step 5: Register Product & Create Configuration
Once the OS is downloaded, the setup tool registers the product on the Particle platform and creates a configuration file.
Example Output:
Step 5:

Great! The download is complete.
Now, let's register your product on the Particle platform.


===================================================================================

Step 6:

Creating the configuration file to write to the Tachyon device...
Step 6: Flash the Device
This step flashes: • Bootloader (UEFI) • Kernel • User-space filesystem • Configuration settings
📌 Key Notes: • This process takes ~10 minutes (due to serial USB flashing). • All previous data is erased. • This step ensures everything is installed from scratch.
Example Output:
Step 7:

Okay—last step! We're now flashing the device with the configuration, including the password, Wi-Fi settings, and operating system.
Heads up: this is a large image and will take around 10 minutes to complete. Don't worry—we'll show a progress bar as we go!

Before we get started, we need to power on your Tachyon board:

1. Plug the USB-C cable into your computer and the Tachyon board.
   The red light should turn on!

2. Put the Tachyon device into download mode:
   - Hold the button next to the red LED for 3 seconds.
   - When the light starts flashing yellow, release the button.
   Your device is now in flashing mode!

? Is the device powered, its LED flashing yellow and a USB-C cable plugged in from your computer? Yes

Starting download. See logs at: /Users/nicklambourne/Documents/particle/tachyon_flash_1740635419081.log

[█████████████████████████] 100% | Flashing complete OS
[█████████████████████████] 100% | Flashing complete Configuration file
Setup Complete! ✅
All done! Your Tachyon device is now booting into the operating system and will automatically connect to Wi-Fi.
🎯 What happens next? • Device boots into Linux. • 5G LTE activates (if no Wi-Fi). • Cloud services initialize. • System begins normal operation.
🔗 Find your device in the Particle Console:
https://console.particle.io/devices/<device id>
Example Output:
Step 8:

All done! Your Tachyon device is now booting into the operating system and will automatically connect to Wi-Fi.

It will also:
  - Activate the built-in 5G modem
  - Connect to the Particle Cloud
  - Run all system services, including battery charging

To view your device in the Particle Console, please navigate to this link:

    https://console.particle.io/YOUR_PRODUCT_NAME/devices/YOUR_DEVICE_NAME

For more information about Tachyon, visit our developer site at: developer.particle.io!
💡 Need more info?
Visit our developer portal for additional guides.
Automation Options
Tachyon’s flashing process can be automated for bulk setup or CI/CD workflows.
🔧 Run Particle Flash with Custom Configurations
particle flash --tachyon <firmware-file>
This allows:
• Flashing local images (vs downloading) • Applying preconfigured settings from a JSON file • Bypassing interactive prompts (such as for use in a manufacturing environment)
Learn More
Run:
particle flash --tachyon --help
to get the full help and options available to the setup command.
Full Setup Video
Here’s a video walkthrough of the entire process:
This guide now fully details the flashing process, improves clarity, and adds additional explanations to each step. Let me know if you need any tweaks! 🚀🔥