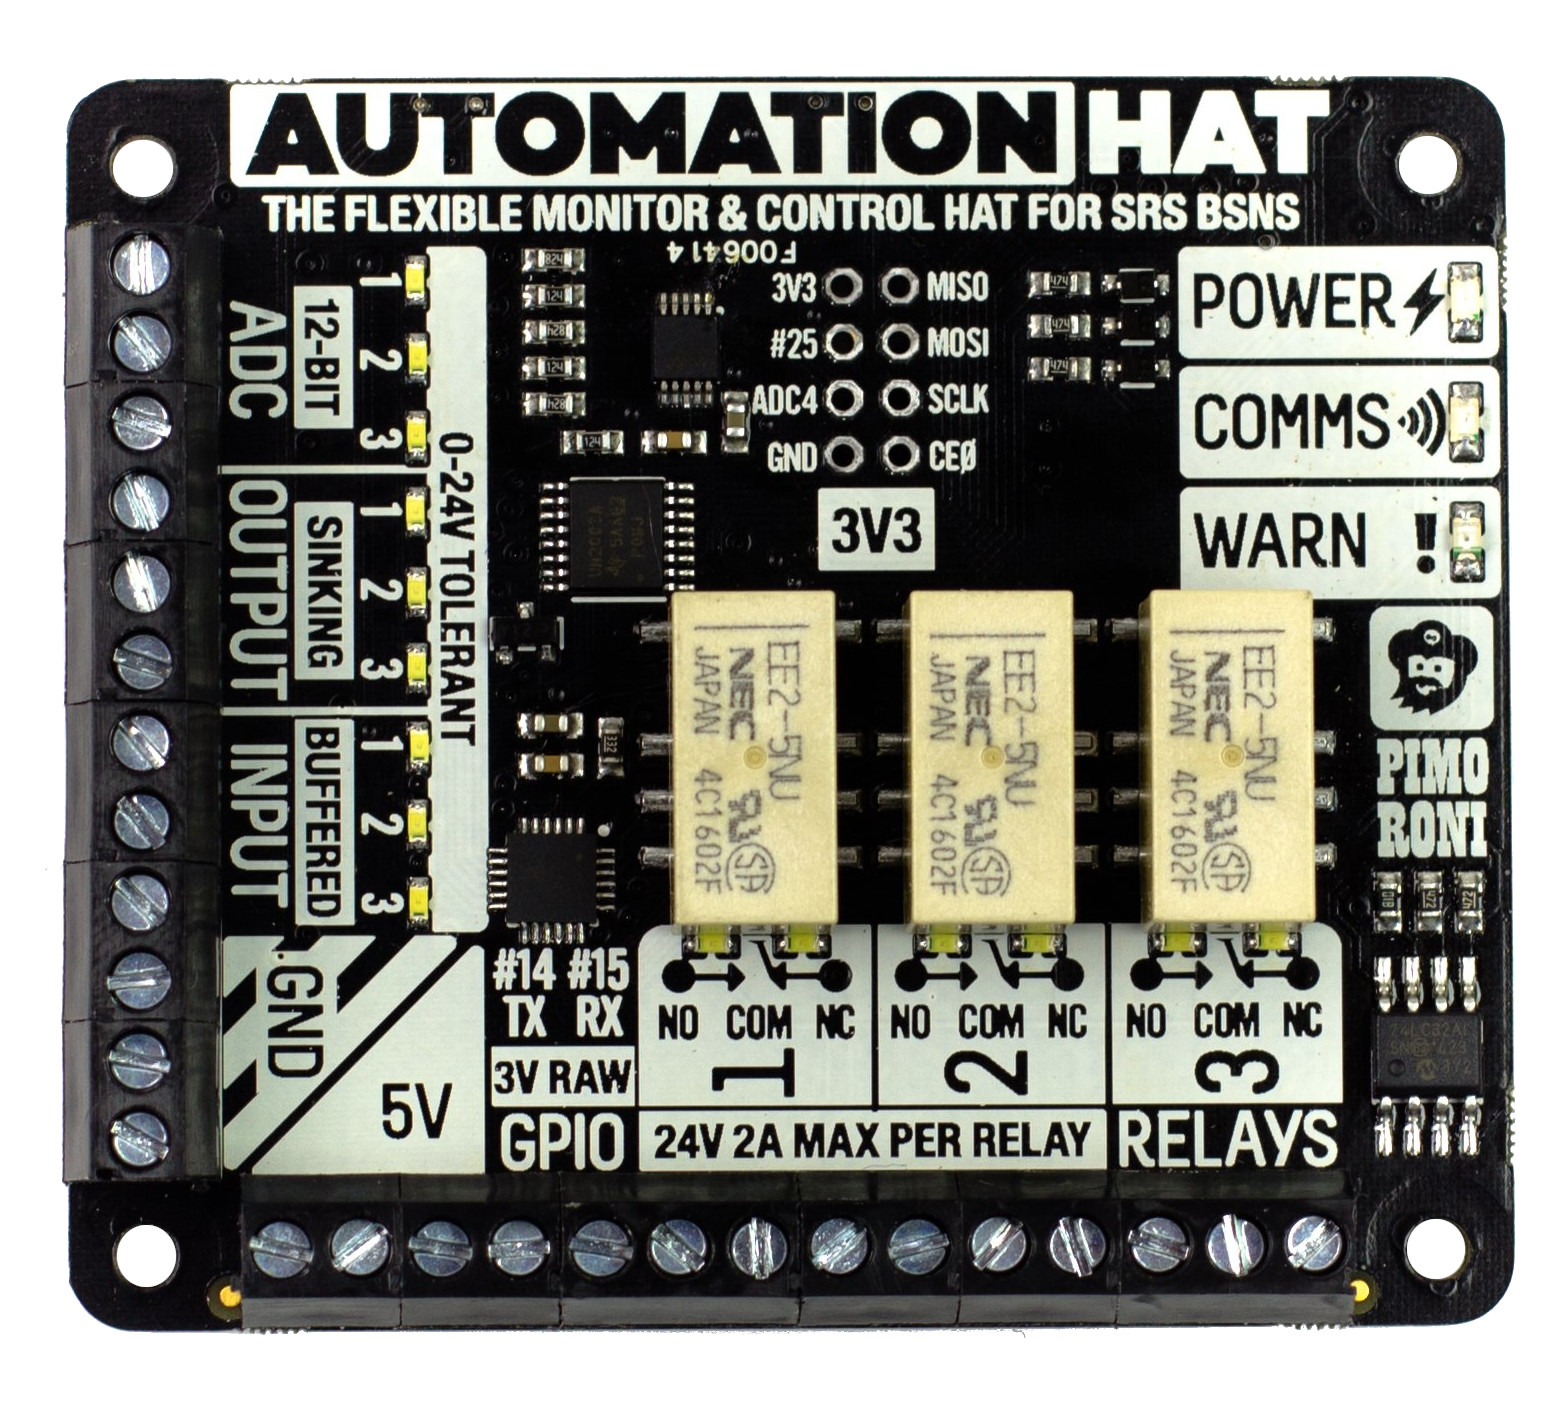
Pimoroni Automation HAT
The Pimoroni Automation HAT is an industrial-grade expansion board for Raspberry Pi and compatable boards like Tachyon, designed to interface with relays, analog sensors, and digital I/O. It’s ideal for prototyping home and industrial automation projects, with a clean Python API and robust electrical interfaces.
Overview
Built for automation, monitoring, and control, the Pimoroni Automation HAT brings powerful features like 24V-tolerant inputs, high-current relays, and analog input support to your projects. The board fits directly on top of a Tachyon and includes useful status LEDs for visual feedback.
Key Features
- 3x Relays → Control AC or DC loads up to 24V/2A.
- 3x Analog Inputs → Read voltages up to 24V for sensors or monitoring.
- 3x 24V Tolerant Digital Inputs → Ideal for detecting external signals or switches.
- 3x Digital Outputs → Drive LEDs, transistors, or logic circuits.
- Status Indicators → Built-in LEDs on every channel for visual status feedback.
- Power Management → Optional external power input for isolating load circuits.
- Python API → Supported by Pimoroni’s open-source Python library for easy scripting.
Designed for industrial-grade prototyping, but not certified for deployment in production environments.
What's Included?
- Pimoroni Automation HAT
- Pre-soldered Header (40-pin GPIO)
- Extended Header (40-pin) for extra clearance if desired
Installing the HAT
Install the Automation HAT onto the Tachyon, and be careful not to push it down to create any short circuits between the underside of the HAT and the Tachyon connectors. If you need more clearance you can install the included header extension that comes with the HAT.
Scanning for i2c devices should show 48 for the Automation HAT.
i2cdetect -y -r 1
     0  1  2  3  4  5  6  7  8  9  a  b  c  d  e  f
00:          -- -- -- -- -- -- -- -- -- -- -- -- --
10: -- -- -- -- -- -- -- -- -- -- -- -- -- -- -- --
20: -- -- -- -- -- -- -- -- -- -- -- -- -- -- -- --
30: -- -- -- -- -- -- -- -- -- -- -- -- -- -- -- --
40: -- -- -- -- -- -- -- -- -- 48 -- -- -- -- -- --
50: -- -- -- -- -- -- -- -- -- -- -- -- -- -- -- --
60: -- -- -- -- -- -- -- -- -- -- -- -- -- -- -- --
70: -- -- -- -- -- -- -- --
(Coming soon: Specifics to avoid with Tachyon, routing of wires, and using other breakout boards that can help)
Installing the Software
First let's check a few things:
python2 --version // 2.7.18
python3 --version // 3.8.10
python --version // not found!
Next, let's update and install some essentials:
sudo apt update
sudo apt install -y python3-pip
sudo apt install --upgrade python3-setuptools
sudo apt install -y python3-venv python3-libgpiod
Let's setup and activate the viritual python environment for Pimoroni libraries:
mkdir -p ~/.virtualenvs/pimoroni
python3 -m venv ~/.virtualenvs/pimoroni --system-site-packages
source ~/.virtualenvs/pimoroni/bin/activate
To deactivate, you can run this... but leave it active for now.
(pimoroni) deactivate
Let's set the python command to prefer python3 over python2.
(pimoroni)  sudo update-alternatives --install /usr/bin/python python $(which python2) 1
(pimoroni)  sudo update-alternatives --install /usr/bin/python python $(which python3) 2
(pimoroni)  sudo update-alternatives --skip-auto --config python
(pimoroni)  python --version // Should now show Python 3.8.10
Upgrade a few python tools
(pimoroni) pip install --upgrade pip setuptools wheel build packaging setuptools-scm
Now we want to make a spot for our code to live (customize the name as desired):
(pimoroni) mkdir -p code
(pimoroni) cd code
Download and install these modified library dependencies for Tachyon
(pimoroni) git clone https://github.com/technobly/automation-hat.git
(pimoroni) git clone https://github.com/technobly/gpiodevice-python.git
(pimoroni) cd automation-hat
(pimoroni) pip install .
(pimoroni) cd ../gpiodevice-python
(pimoroni) pip install .
Finally, let's test that everything is working. Run Python in your virtual environment and paste in these two lines one at a time. Type exit() to exit. You will see the green power LED light up. When you exit it will turn off.
import automationhat
automationhat.light.power.on()
Running Example Applications
(pimoroni) cd /root/code/automation-hat/examples/hat

# Press CTRL+C to Exit all example apps
(pimoroni) python output.py
(pimoroni) python input.py
(pimoroni) python analog.py
(pimoroni) python lights.py
(pimoroni) python relay.py
Note: Unfortunately the 3 inputs on the Automation HAT will always read as a high input due to the way they are designed and how they interact with Tachyon's GPIO level shifter IC. So they are not distracting, the 3 input LEDs have been disabled from automatically turning on in the library. They can be repurposed as general indicators. Example: automationhat.input.one.light.on() / .off() / .toggle() / .write(0|1)