Muon Unboxing
We know some of you love a classic unboxing moment, that satisfying reveal of what's inside the box. For Muon, we’re giving you a clean, visual breakdown of what to expect.
If you’re the type who just wants to get to work, we’ve got you covered too. Everything is laid out for quick setup, and you can always come back here for reference.
What’s in the Box
You can purchase Muon as a carrier board only (SKU: MUONCB), as a kit (SKU: MUONCBKIT), or pair it with an M-SoM.
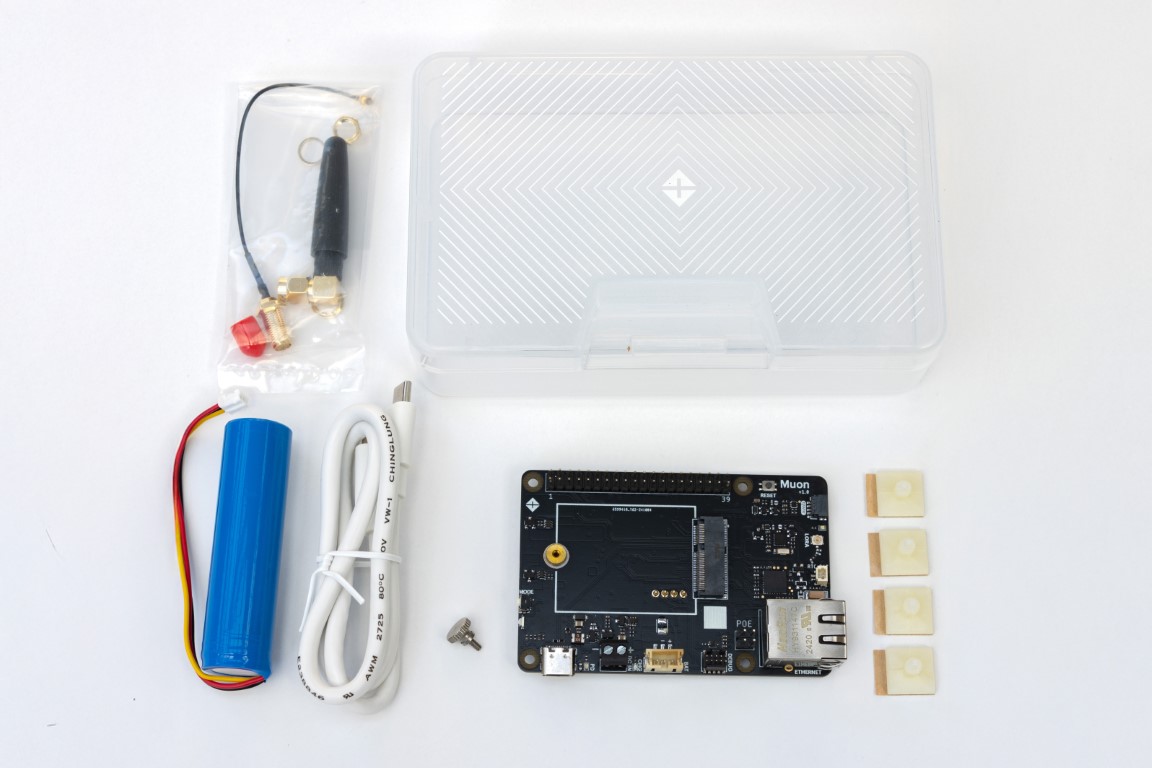
This documentation uses the Muon Kit as the reference. When you open the kit, carefully remove each component from the packaging. Inside, you’ll find:
- Muon Carrier Board
- Plastic case for easy prototype setup
- LoRaWAN antenna
- USB 2.0 Type-C to Type-C PD cable
- SMA female to IPEX MHF1 cable
- Single-cell 3250 mAh battery with 3-pin connector
- Standoffs
To complete your setup, you also need a B-SoM or M-SoM module, which includes:
- M-SoM or B-SoM
- Cellular antenna
- Optional BLE/Wi-Fi antenna
- Optional GNSS antenna
The Muon and M-SoM can also be purchased together as a combined kit.
When assembled, the Muon and SoM form a complete gateway and system-on-module solution.
Here’s a labeled diagram of everything included:

Master Inventory of SoM and Muon Combined
| Label | Feature |
|---|---|
| 1 | M-SoM |
| 2 | Expansion connector |
| 3 | USB-C |
| 4 | USB Power LED ("PD") |
| 5 | Charge LED ("CHG") |
| 6 | VIN (6–12 VDC) |
| 7 | LiPo battery connector (3-pin) |
| 8 | SWD/JTAG debugging connector |
| 9 | Ethernet RJ-45 connector |
| 10 | LoRaWAN antenna |
| 11 | LoRaWAN status LED |
| 12 | QWIIC (3.3V I2C) connector |
| 13 | RESET button |
| 14 | RGB status LED |
| 15 | MODE button |
| 16 | GNSS antenna |
| 17 | Cellular antenna |
| 18 | Wi-Fi/BLE antenna |
| 19 | LiPo battery with temperature sensor |
| 20 | LoRa antenna connector (SMA) |
| 21 | Muon Wi-Fi/BLE connector |
Note: Each component is marked in the image above for clarity.
About the Box
The Muon box doubles as a project enclosure, but you’ll need to make a few modifications. If you plan to use it long-term, you’ll need to drill or cut holes to route connectors or secure components. For now, we recommend removing the components and assembling them on your desk to get started quickly.