eSIM Setup
Great news! Your Tachyon already comes with an eSIM profile preinstalled. You can use this profile to connect to the internet and the Particle Cloud out of the box.
If you'd like to add a third-party profile to the internal eSIM, you can follow the instructions below to manually provision one.
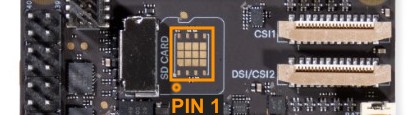
A third-party SIM can also be soldered to the MFF2 footprint located within the SD card outline (see External SIM Support below).
At a glance
| Step | Action |
|---|---|
| 1 | Verify which SIM we are using |
| 2 | Disconnect and Power cycle modem |
| 3 | Download eSIM profile with RSP URL |
| 4 | Enable eSIM profile |
| 5 | Verify active ICCID |
| 6 | Add custom APN |
| 7 | Connect |
| 8 | (Optional) Switch back to Particle eSIM |
What is an eSIM?
An eSIM (Embedded SIM) is a programmable SIM built into your device. It can store multiple profiles and allows you to switch carriers or plans remotely.
The eSIM architecture is defined by GSMA SGP.22, which specifies how eSIM profiles are downloaded and managed through a secure process called Remote SIM Provisioning (RSP).
An RSP URL (Remote SIM Provisioning URL) is used to securely download an eSIM profile to your device.
eSIM Third-party Setup
This guide walks you through manually setting up and provisioning a third-party eSIM profile on Tachyon.
Please read through all instructions before starting.
1. Verify we are using the INTERNAL SIM (unless external is truly desired)
Log in to your Tachyon as root and execute the following command:
particle-tachyon-ril-ctl active_sim --get
active_sim: 1 (INTERNAL)
Note: See External SIM Support below for commands to switch to desired SIM.
2. Prepare the modem
You can monitor progress via serial debug console or a separate SSH connection:
journalctl -u particle-tachyon-rild -n 100 -f
Execute the following commands:
particle-tachyon-ril-ctl disconnect
particle-tachyon-ril-ctl power off
particle-tachyon-ril-ctl power on
3. Download the eSIM profile
Start the download of your new eSIM profile using the RSP (Remote SIM Provisioning) URL provided by your carrier or eSIM provider:
particle-tachyon-ril-ctl esim download '<rsp_url>'
The RSP URL is a secure activation link, provided by your carrier or eSIM provider, typically in this format:
LPA:1$example.sm-dp-plus.com$MY-ACTIVATION-CODE
- The LPA:1$ prefix is required.
- The URL may include query parameters or long tokens.
- If entering this command in the terminal, you should quote the URL in single quotes ' '.
- If the URL contains special characters &, $, ?, =, %, quoting ensures correct parsing.
You can monitor the esim command result codes in a separate terminal if you'd like a more succinct summary of what is happening, vs. journalctl.
particle-tachyon-ril-ctl esim status --follow
- Download starts: 100
- Download success: 101
- Errors: higher 1xx numbers
Note: The download typically takes about 30 seconds but may take a couple of minutes depending on your network connection.
4. Enable your eSIM profile
Once the profile is downloaded, enable it:
particle-tachyon-ril-ctl esim enable <iccid>
esim status --follow will show:
- Enable starts: 300
- Enable success: 301
- Errors: higher 3xx numbers
5. Verify active profile
Verify your active ICCID matches the one you just downloaded and enabled:
Don't worry if the ICCID shows an 'F' at the end. This just means your ICCID is only 19 digits long and requires an 'F' for internal padding. This is only shown because it's a raw AT command.
particle-tachyon-ril-ctl sendat at+iccid

ICCID: 8912341234123412341F

OK
In a separate terminal, run:
particle-tachyon-ril-ctl esim profiles --follow
Listening for LpaProfiles changes...
Then run the following command in another terminal:
particle-tachyon-ril-ctl esim list
After a brief moment, in the first terminal you will see:
LpaProfiles: [89000123456789012341, disabled]
[8943123456789012345, disabled]
[8943123456789012346, disabled]
[8943123456789012347, enabled]
If your desired ICCID is not active/enabled:
- Re-run
esim enable <iccid>if the profile is listed, but disabled. - Re-run
esim download '<rsp_url>'if not listed.
6. Add the custom APN
First we must set the APN required for the ICCID. You don't need to include the trailing 'F', but if you do it won't break anything.
particle-tachyon-ril-ctl apn --add <iccid> <apn>
You can remove the custom APN as well:
particle-tachyon-ril-ctl apn --remove <iccid>
And finally, you can also list the custom APNs currently set. "no entries" will be shown if none have been added.
particle-tachyon-ril-ctl apn --get
iccid: "8912341234123412341", apn: "myapn"
7. Connect
Note: It may take some time to initially connect a new profile.
particle-tachyon-ril-ctl connect
8. (Optional) Switching back to Particle eSIM profile
If you want to switch back to the default Particle eSIM profile:
particle-tachyon-ril-ctl disconnect
particle-tachyon-ril-ctl esim enable <iccid>
particle-tachyon-ril-ctl connect
You may also remove the third-party eSIM profile you added if you don't need to switch back to it:
Note: The profile must not be active when deleting
Note: Some eSIM profiles are one-time programmable, so if you delete them you will not be able to download the same RSP URL again.
particle-tachyon-ril-ctl esim delete <iccid>
Default profiles on the eSIM
The eSIM contains three profiles by default:
- TS.48 test profile — you can delete this.
- Two Particle-provided eSIM profiles — you cannot delete these.
External SIM support
Tachyon also supports an external SIM soldered to the MFF2 footprint located within the SD card outline.
To enable the EXTERNAL SIM, use the following command:
particle-tachyon-ril-ctl active_sim --set 2
To enable the INTERNAL SIM, use the following command:
particle-tachyon-ril-ctl active_sim --set 1
You can also list the currently set active_sim.
particle-tachyon-ril-ctl active_sim --get
active_sim: 1 (INTERNAL)